Get every camera angle from one take
One camera on a tripod, one take, and Multicam gives you the rest of the setups. Here is a real project made for NOLGIA, start to finish: a young man beside a black Ferrari on a lakeside court, cut on his own pauses into a pull-out, a drone shot, a profile and an orbit, with every prompt as it was sent.
- 15 min read
- Updated
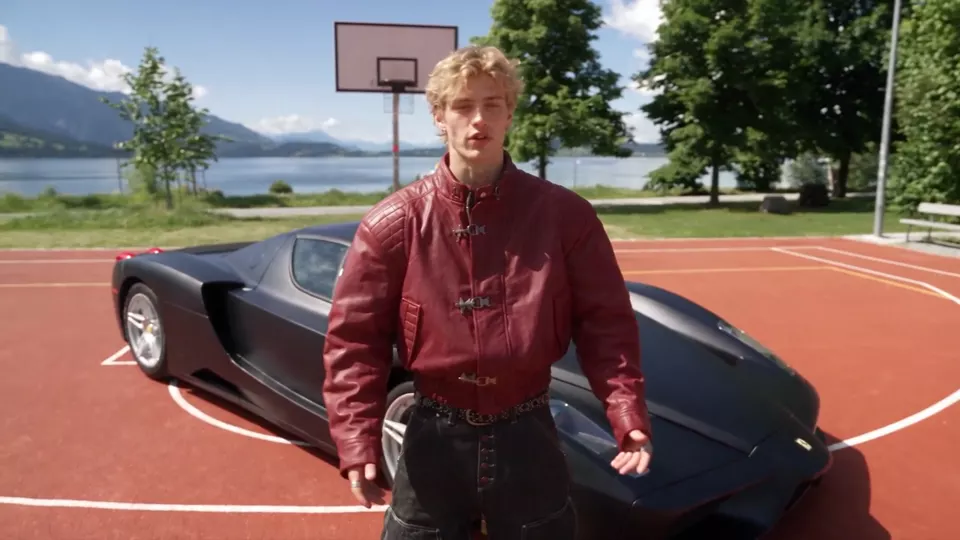
This guide follows one real project made for NOLGIA: a 15 second take of a young man in a burgundy leather jacket beside a black Ferrari on a basketball court by a lake, saying one line to a camera that never moves. Multicam turned it into a pull-out reveal, a drone shot, a profile and an orbit, all in sync with his voice, and cut them into one multicam edit. He is fictional, generated for NOLGIA. Every prompt below is quoted as it was sent; the only change is that long dashes are typed as hyphens.
First the take and how it was made, then every step in the Multicam composer: add the take, set where each shot begins and ends, choose each shot's angle, generate, and what came back. At the end are all sixteen angles the take got, the ones that missed, and what the project took.
What Multicam gives you
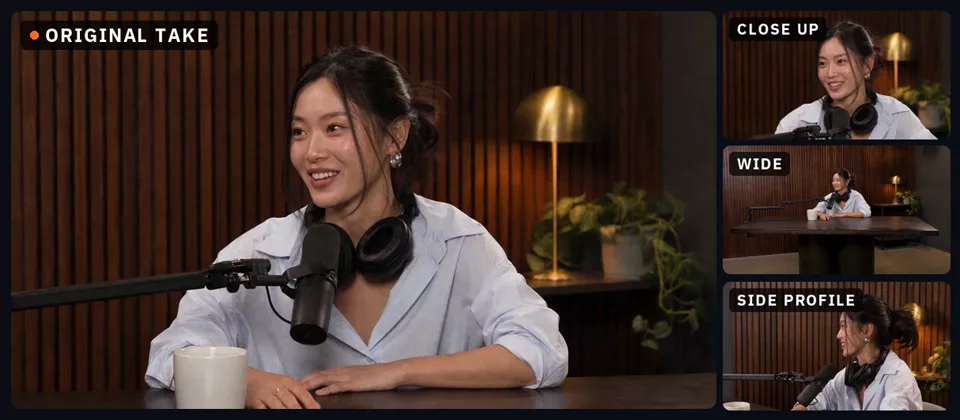
Multicam re-films one take from cameras that were never there. You bring one locked off shot; every angle you pick comes back as its own clip of the whole take, in sync with it and carrying its original sound, and a highlight edit cuts between them where the take pauses or moves. It is the coverage a crew would shoot with three or four cameras, from one.
The take: one shot that never moves
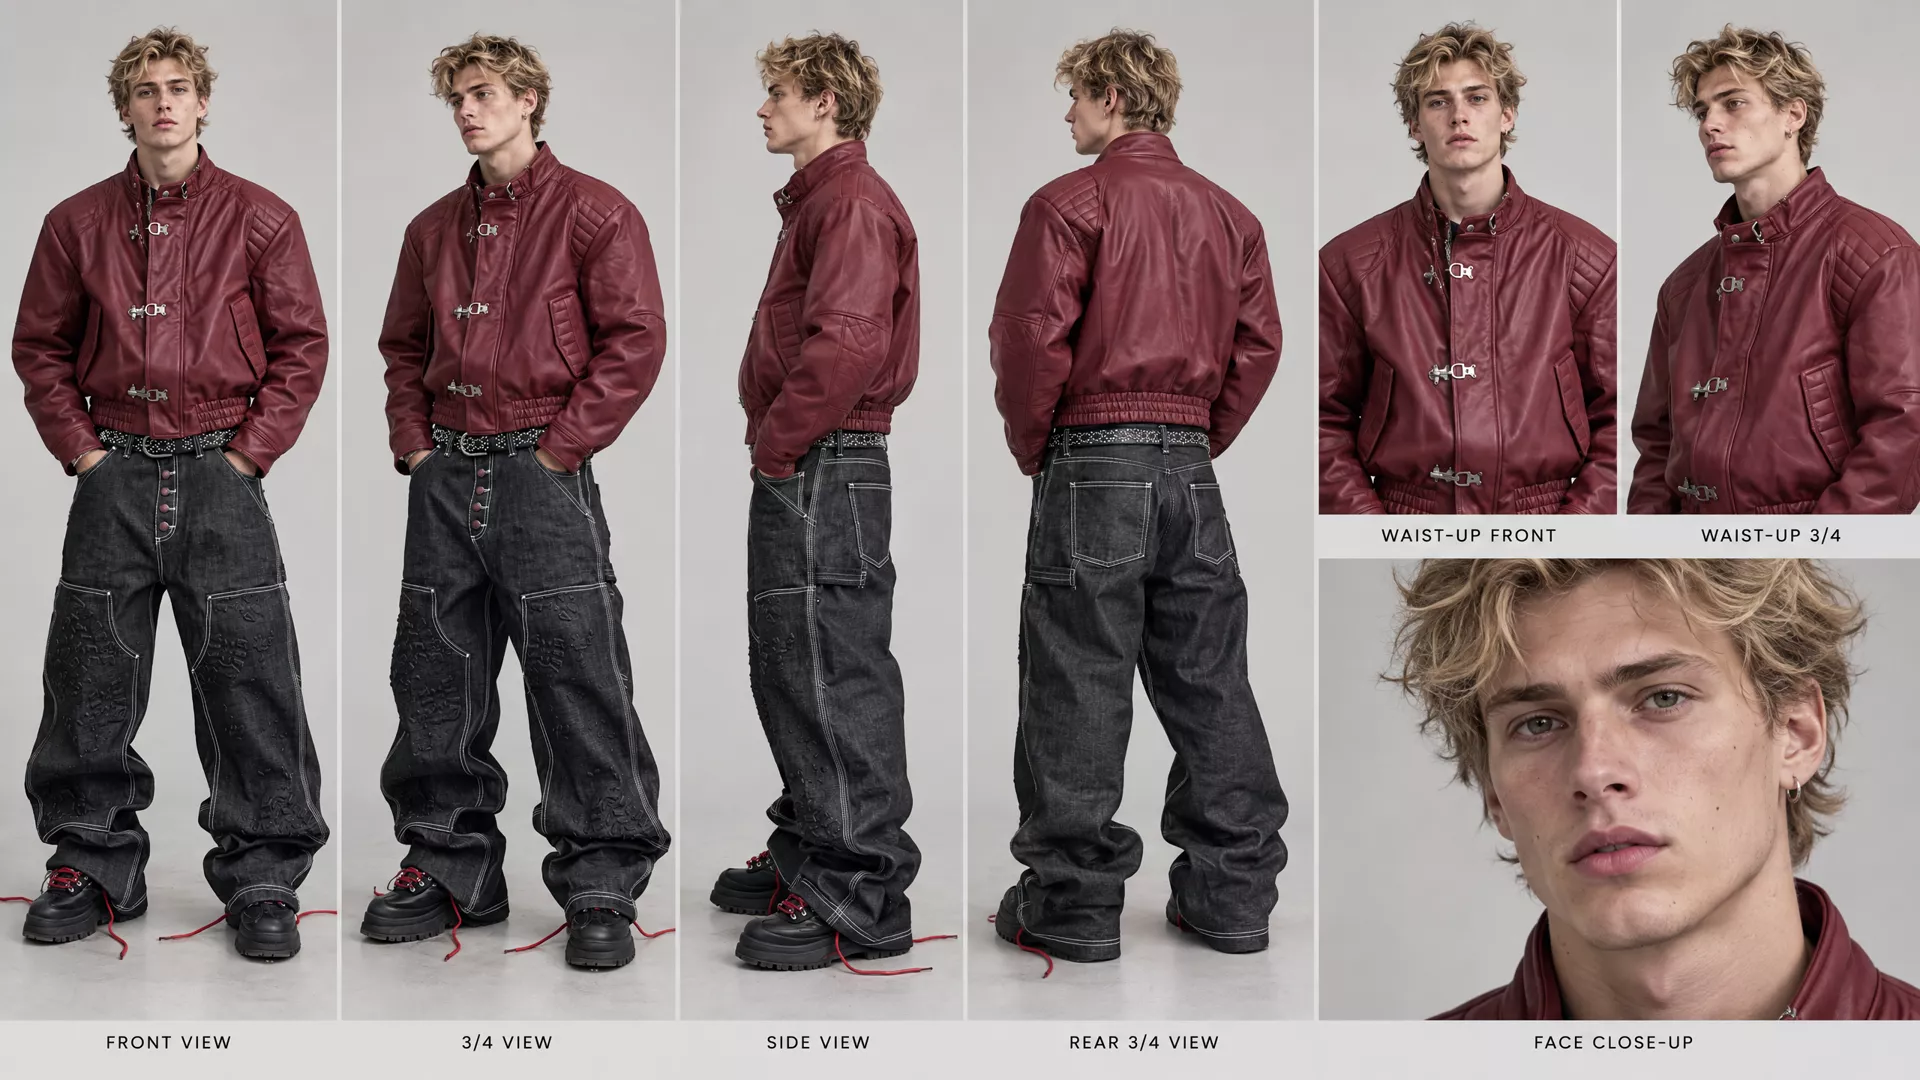
Multicam can only show what the take shows, so the take does most of the work. It works best when the camera does not move, the whole scene is in frame and lit, and the person moves enough to give the other cameras something to see. Our take was generated with Seedance 2.5 from three reference images: this character sheet, a photo of a black Ferrari Enzo, and a photo of a basketball court by a lake with mountains behind it. The two photos are not shown here.
The take needed five tries, each Seedance 2.5 with the same line of dialogue:
| Take | What changed | Length |
|---|---|---|
| 1 | A white studio, looking into the lens the whole time | 8 s |
| 2 | The same prompt, longer | 12 s |
| 3 | A direction for each phrase: look up, left, right, then back to the lens | 12 s |
| 4 | All three references: the court and the Ferrari, his whole body in frame | 12 s |
| 5 | The references and the directions together, long enough for the whole line | 15 s, kept |
SEEDANCE 2.5 - LOCKED FRONT CAMERA / CONTROLLED GAZE PERFORMANCE

REFERENCE IMAGES:
Use all uploaded references strictly:
1. Character sheet = exact male character, face, blonde hair, body and wardrobe
2. Ferrari reference = exact black Ferrari Enzo
3. Basketball court/location reference = exact environment

Preserve all reference details accurately.

CHARACTER:
The exact same white/Caucasian blonde male from the character sheet.

Preserve his exact face, facial proportions, blonde hairstyle, hairline, eyebrows, eyes, nose, lips, jawline, skin tone, physique, body proportions and wardrobe.

Preserve the exact burgundy leather jacket, black oversized cargo denim, studded belt, chunky black platform sneakers and all other wardrobe details exactly as shown in the character sheet.

Do not redesign or alter the character.

SCENE:
He is standing naturally on the provided basketball court, directly beside the provided black Ferrari Enzo.

The Ferrari must remain clearly recognizable and physically consistent with the supplied reference.

FULL-BODY FRAMING:
Use a wide, full-body composition.

His ENTIRE body must remain visible from the top of his head to the bottoms of both shoes for the ENTIRE SHOT.

Do not crop his feet, legs, hands or head.

The black Ferrari Enzo should also remain clearly visible beside him.

CAMERA - ABSOLUTELY LOCKED:

The camera is mounted on a tripod directly in front of him.

The camera is perfectly straight-on and frontal.

The camera NEVER moves.

NO pan.
NO tilt.
NO dolly.
NO zoom.
NO orbit.
NO handheld movement.
NO camera shake.
NO reframing.
NO change in focal length.
NO cuts.

The camera stays in exactly the same position for the entire take.

CRITICAL:
Even when the character turns his head and body toward different directions, the camera DOES NOT FOLLOW HIM.

The camera continues looking at him from the exact same frontal position.

He is simply turning his head, gaze, shoulders and upper body naturally within the locked frame.

DIALOGUE:

He says exactly:

“This is one shot, one take, four different camera angles from it. I didn’t reshoot anything. Any distance, any scale, the same footage. Just different camera angles. Here’s how you do it.”

EXACT PERFORMANCE AND GAZE CHOREOGRAPHY:

“This is ONE SHOT”

He looks STRAIGHT DIRECTLY INTO THE CAMERA LENS.

His face is completely oriented toward the camera.
Direct eye contact.
Natural confident expression.

IMPORTANT: Do NOT look away during “one shot.”

---

“ONE TAKE”

Immediately after saying “one shot,” he naturally shifts his gaze UPWARD.

He is NOT looking at the camera.

His eyes look above the camera and his head/chin naturally lifts slightly upward.

His upper body can subtly follow the movement.

IMPORTANT:
During the words “one take,” his eyes must clearly be looking UP and AWAY from the camera.

---

“FOUR DIFFERENT CAMERA ANGLES FROM IT”

He naturally turns his HEAD toward HIS LEFT.

His eyes look to his left, away from the camera.

Allow his shoulders and upper torso to naturally rotate slightly toward his left as he talks.

He continues speaking while looking LEFT.

IMPORTANT:
During the entire phrase “four different camera angles from it,” he should clearly be looking toward his LEFT.

The camera remains completely frontal and locked.

---

“I DIDN’T RESHOOT ANYTHING”

He naturally transitions from looking left and turns through center toward HIS RIGHT.

His head turns toward his right.
His eyes look toward his right.
His shoulders and upper torso naturally follow the head movement.

He continues speaking while looking RIGHT.

IMPORTANT:
During “I didn’t reshoot anything,” he should clearly be looking toward his RIGHT and NOT directly at the camera.

The camera does not move even though he turns.

---

“ANY DISTANCE, ANY SCALE, THE SAME FOOTAGE.”

He naturally begins turning back toward the camera.

His gaze gradually returns toward the lens.

Use relaxed, natural explanatory hand gestures.

---

“JUST DIFFERENT CAMERA ANGLES.”

He is now facing the camera again.

Direct eye contact.

Natural conversational expression.

---

“HERE’S HOW YOU DO IT.”

He continues looking directly into the camera.

Finish with a subtle confident expression, slight natural smile if appropriate.

NATURAL MOVEMENT:

The head turns must NOT look like separate programmed poses.

They should happen as one continuous natural performance.

He can naturally rotate:
- head
- neck
- shoulders
- upper torso
- arms

His body can follow his gaze naturally when looking left or right.

He can shift his weight slightly.

He can use natural hand gestures while explaining.

Do not make the movements exaggerated or theatrical.

The character should look like a real person casually explaining something to someone standing behind the camera.

REALISTIC HUMAN PERFORMANCE:

Natural blinking.
Natural breathing.
Natural facial micro-expressions.
Natural mouth movement.
Precise lip synchronization.
Natural pauses.
Subtle eyebrow movement.
Realistic eye movement.

Do not make him stare unnaturally.

REALISTIC SKIN:

Extremely photorealistic human skin.

Visible natural pores.
Fine skin texture.
Subtle imperfections.
Fine facial hairs.
Realistic lips.
Natural under-eye texture.
Natural variation in skin tone.
Realistic highlights and shadows.

No plastic skin.
No waxy skin.
No beauty filter.
No excessive skin smoothing.
No CGI appearance.

WARDROBE:

Preserve the exact clothing from the character sheet.

Realistic burgundy leather grain.
Natural leather wrinkles and folds.
Realistic stitching.
Realistic denim weave.
Natural denim folds.
Realistic distressing.
Physically accurate clothing movement as he turns.

LIGHTING:

Realistic basketball-court/environmental lighting based on the supplied location reference.

Natural shadows.
Realistic contact shadows.
Natural skin exposure.
Realistic reflections on the black Ferrari.

Avoid exaggerated cinematic lighting or artificial glow.

FINAL CAMERA RULE - ABSOLUTE:

THE CAMERA DOES NOT MOVE AT ANY POINT.

The camera always captures him from the FRONT.

The visual changes come entirely from HIS PERFORMANCE:

ONE SHOT → LOOK STRAIGHT AT CAMERA

ONE TAKE → LOOK UP, AWAY FROM CAMERA

FOUR DIFFERENT CAMERA ANGLES FROM IT → TURN HEAD/BODY AND LOOK LEFT

I DIDN’T RESHOOT ANYTHING → TURN HEAD/BODY AND LOOK RIGHT

ANY DISTANCE... → BEGIN RETURNING TO CAMERA

JUST DIFFERENT CAMERA ANGLES → LOOK AT CAMERA

HERE’S HOW YOU DO IT → LOOK AT CAMERA

The camera remains perfectly locked, straight-on and frontal through every single gaze and body-direction change.

ONE CONTINUOUS TAKE.
NO CUTS.
NO CAMERA MOVEMENT.
NO ANGLE CHANGES.
NO REFRAMING.

No subtitles.
No captions.
No text.
No logos.
No graphics.
No background music. Camera: locked off on a tripod, completely still; all motion comes from the subject and the scene.
The last line of the prompt was added by NOLGIA: it is the Locked off camera move, picked in the camera move row of the video composer. The realistic video guide covers character sheets and shot prompts in depth.
Tip:Give the other cameras something to see. The prompt turns his head on each phrase: up on "one take", to his left on "four different camera angles from it", to his right on "I didn't reshoot anything", then back to the lens. A take where the person turns and gestures gives every cut a new look, and gives a profile or an orbit something to show.
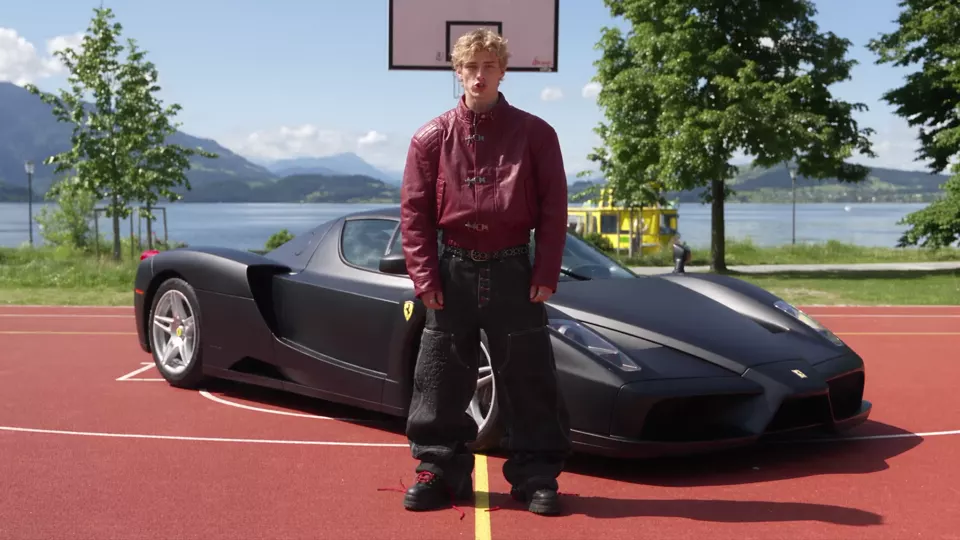
Try it with our take
- The take: 15 seconds, locked off, with his lineMP4 video · 1280x720 · 1.6 MBDownload
Open Multicam and add your take
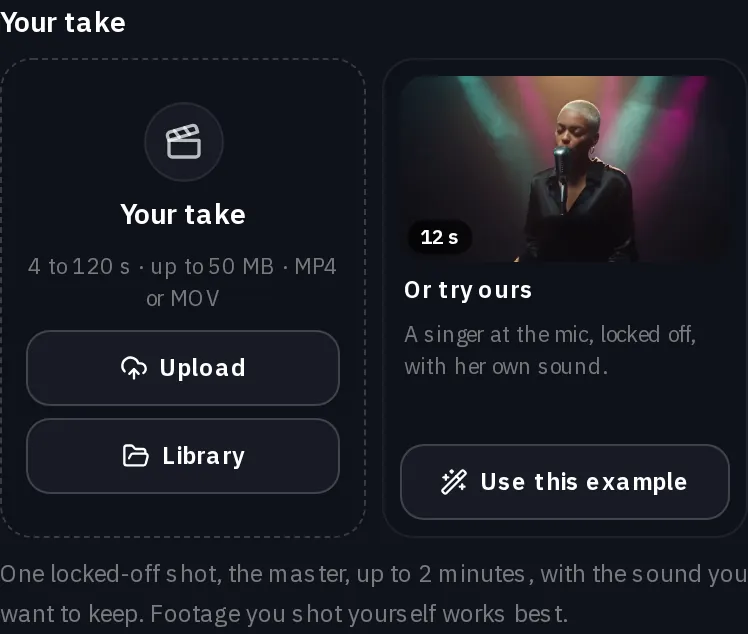
Open Multicam from the Create menu in the header. It is also the last tab along the top of the video composer. Under Your take, press Upload for an MP4 or a MOV, or Library for a video you already have. The empty tile lists what a take can be on the model you picked; once it is in, the tile shows its length and size. Multicam runs on Pro and Studio plans.
A take runs from 4 seconds to 2 minutes on Seedance 2.5. Up to 30 seconds it is used whole; a longer take is rendered in parts that join on a cut, so every angle still runs its full length. Ours was 15 seconds. No take yet? Use this example under Or try ours, beside the empty tile, copies our own example take into your Library for free.
Watch for this:Keep the frame rate at 24 or more. One of our tries used a 5.7 second trim of the take, saved as a MOV whose frames averaged just under 24 a second. The model refused all four runs on it with "Frame rate must be between 23.8 FPS and 60 FPS", and each time the credits came back. The full take, at its own 24 frames a second, ran. If you trim a take before you add it, export it at a steady 24, 25 or 30 frames a second.
Set where each shot begins and ends
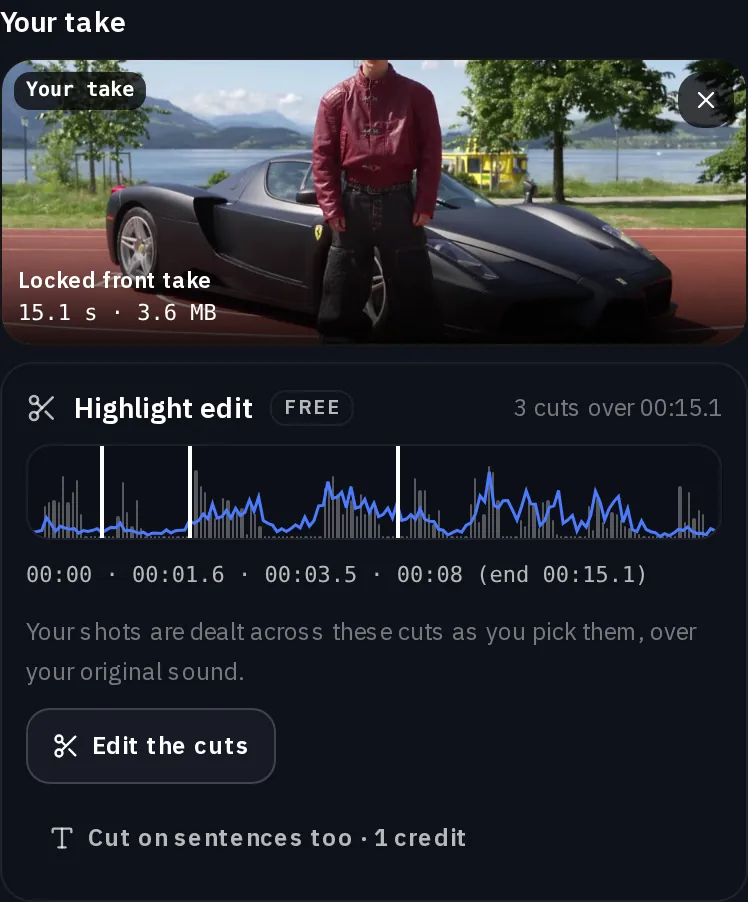
Once the take is in, Multicam scans it by itself, for free: it listens for pauses, watches for movement and marks where a cut lands well. The Highlight edit card under your take draws the take's sound and movement with each cut on it, and lists the times. These cuts are where the multicam edit changes camera. They never limit what is rendered.
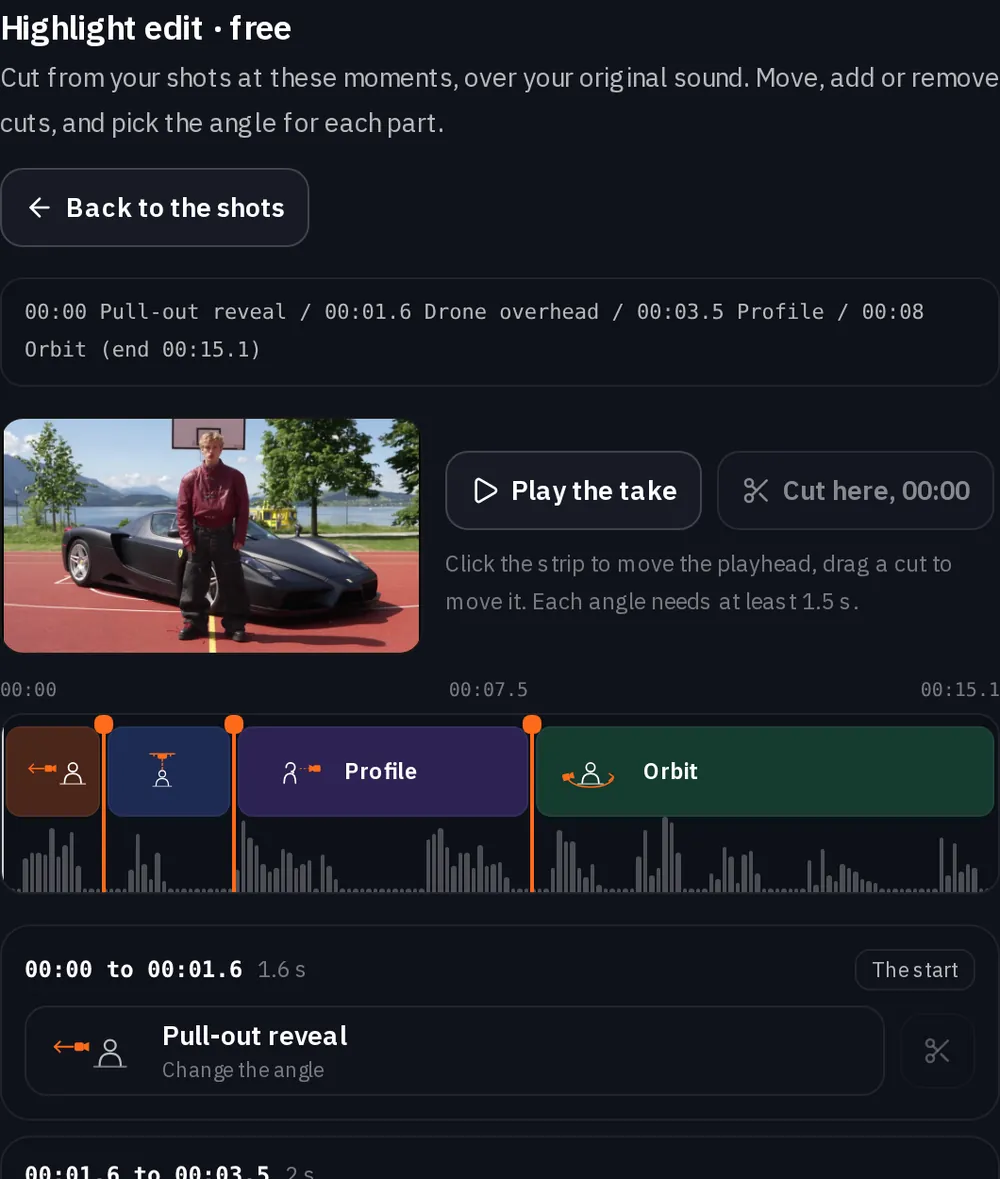
Press Edit the cuts to open them beside the form. Press Play the take, then Cut here at the playhead to add a cut, or drag a cut along the strip. Each part has buttons to move its cut half a second either way, split it in two or remove the cut. A part needs at least 1.5 seconds, and a take can have up to 8 parts. On a phone the parts are a list with the same buttons.
For a talking take, Cut on sentences too reads the words first, so a cut can land on every new sentence and each part shows the words said in it. Reading the words costs a little, and the price is on the button; a take whose words were already read scans them for free.
We did not read the words on this take. Our cut list has four parts, each cut in a pause between his phrases:
- 00:00 to 00:01.6: "This is one shot."
- 00:01.6 to 00:03.5: "One take."
- 00:03.5 to 00:08: "Four different camera angles from it. I didn't reshoot anything."
- 00:08 to the end: "Any distance, any scale, the same footage. Just different camera angles. Here's how you do it."
Choose each shot's angle
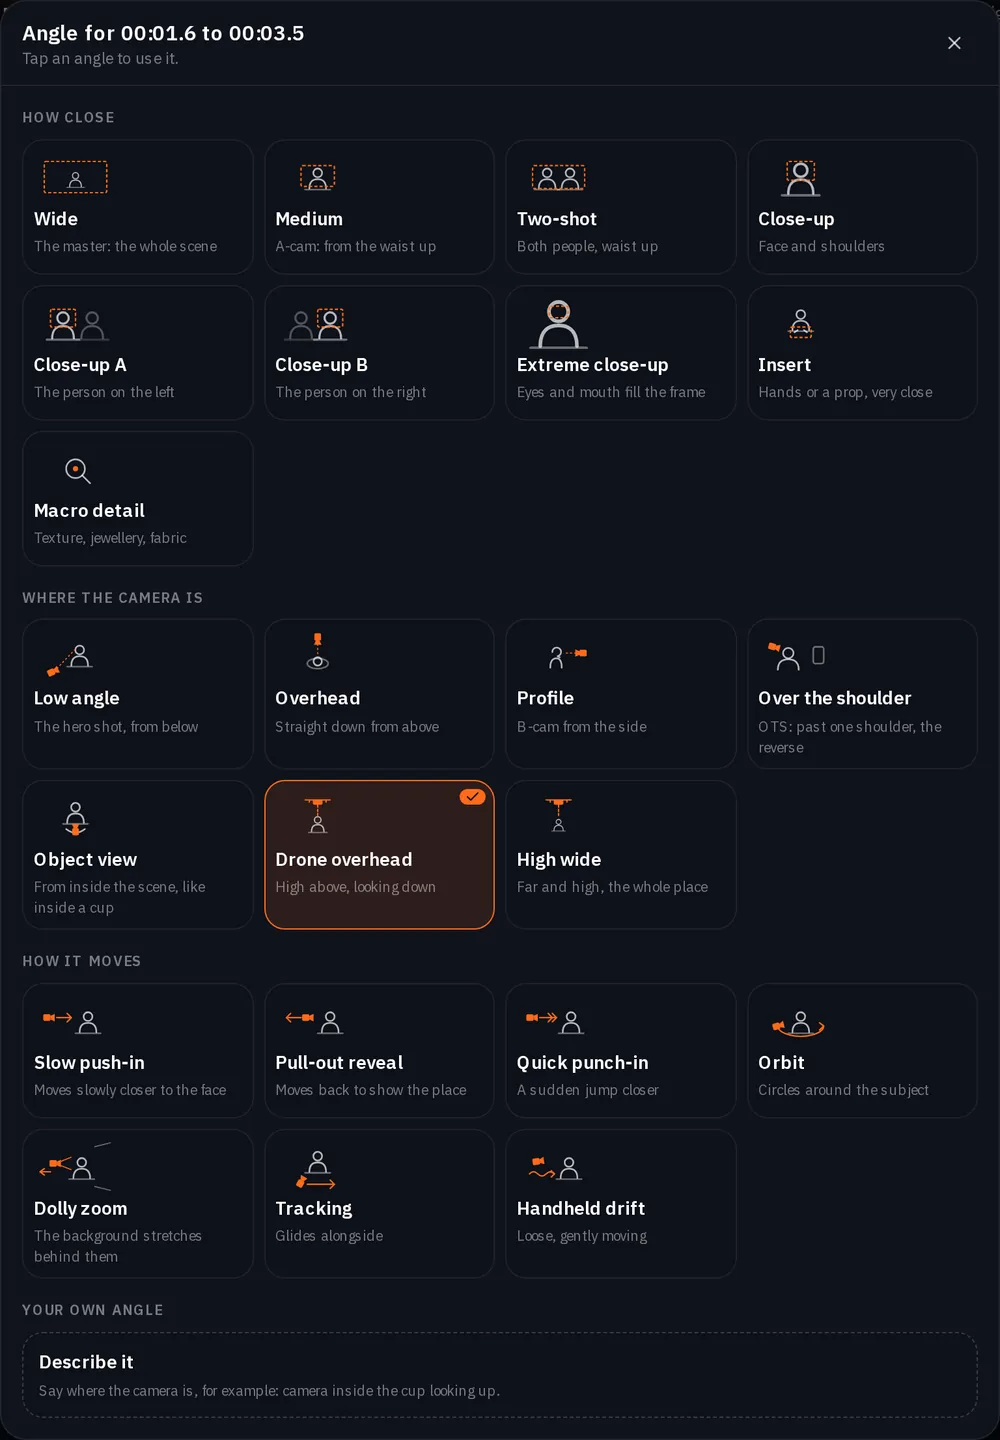
Beside the form are the Shot presets: every angle Multicam offers, each shown moving on one of our own takes when you hover or tap it. They are grouped the way you would set up a camera:
- How close: Wide, Medium, Two-shot, Close-up, Close-up A and B, Extreme close-up, Insert and Macro detail.
- Where the camera is: Low angle, Overhead, Profile, Over the shoulder, Object view, Drone overhead and High wide.
- How it moves: Slow push-in, Pull-out reveal, Quick punch-in, Orbit, Dolly zoom, Tracking and Handheld drift.
- Your own angle: describe a camera the list does not have, like a camera inside the cup looking up, and press Add the shot.
Click an angle to pick it. The angles you pick are listed under Your shots and dealt across your cuts in the order you picked them; the Packs row picks a set for one kind of shoot in one click, from Auto to Interview or doc. To give one part a different angle, open Edit the cuts and press the angle on that part, marked Change the angle. The picker has the same groups: tap an angle to use it, or choose Describe it and press Use this angle.
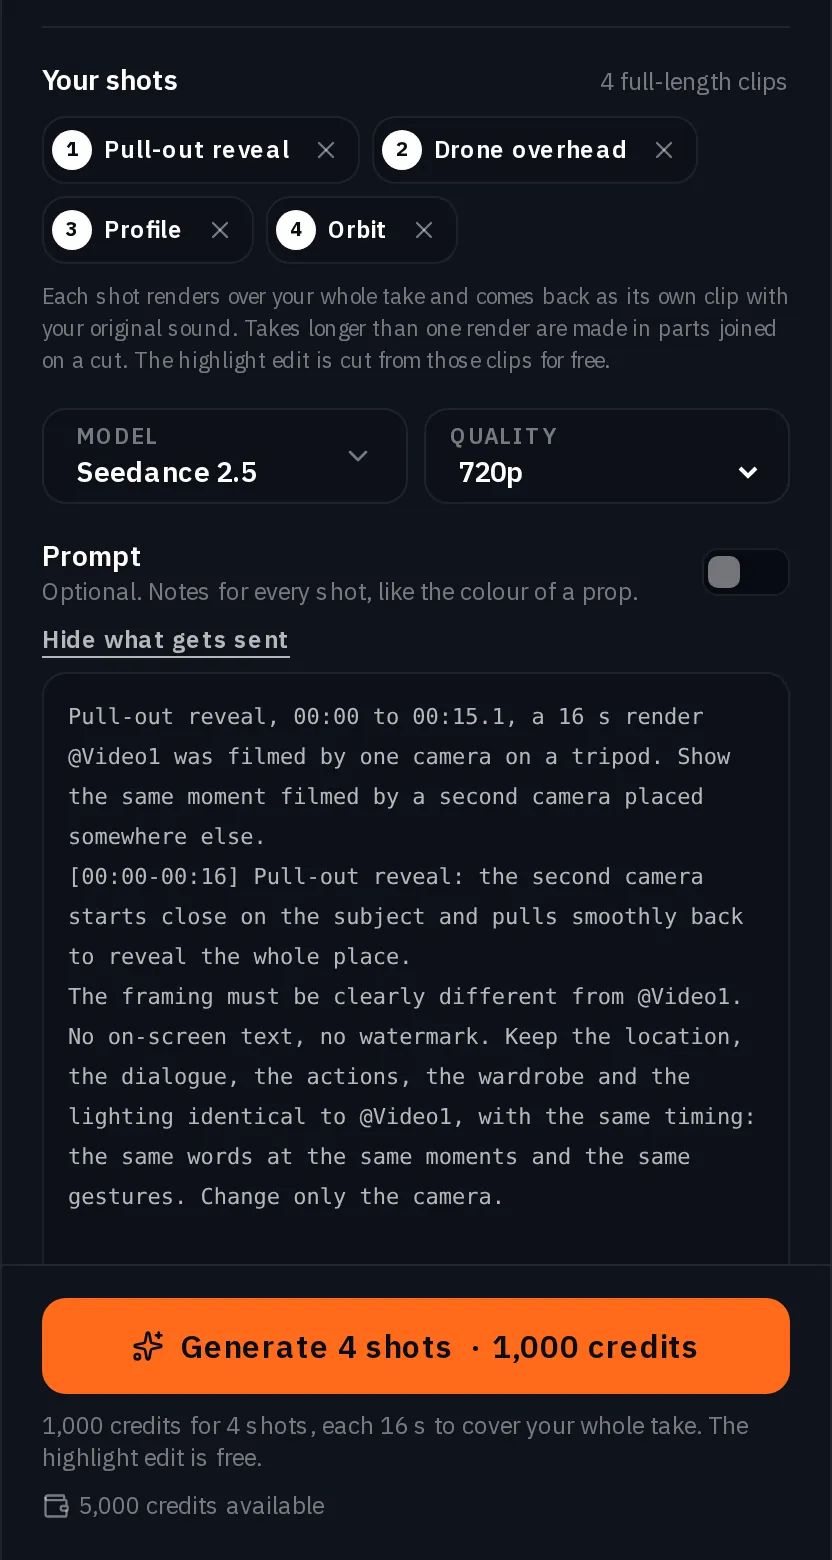
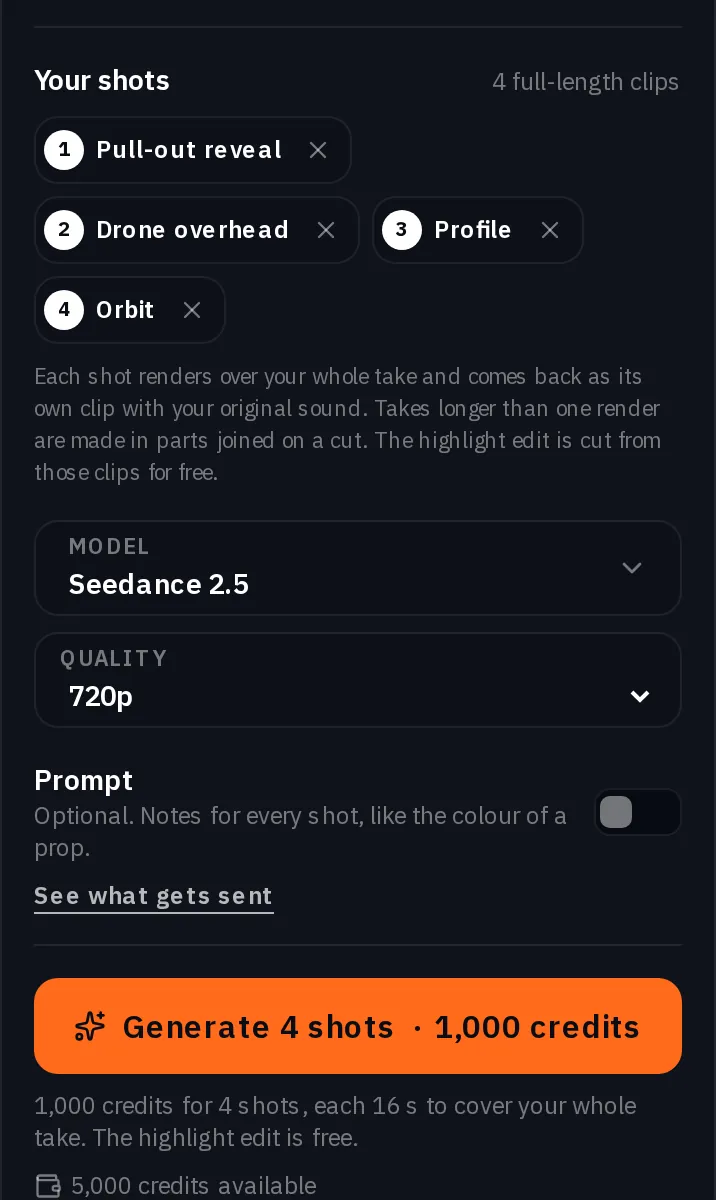
We picked four, in this order: Pull-out reveal, Drone overhead, Profile and Orbit. Picked in that order, they land one per part, so he opens in a pull-out on "This is one shot", the drone takes "One take", the profile takes the next two phrases and the orbit runs to the end.
Multicam writes the prompt for every angle: the take is @Video1, the angle is one timed line, and the last sentence always keeps the place, the words and the gestures. This is the one it sent for the drone shot:
@Video1 was filmed by one camera on a tripod. Show the same moment filmed by a second camera placed somewhere else.
[00:00-00:16] Drone overhead: the second camera flies high above the scene and looks down on the subject and the whole place.
The framing must be clearly different from @Video1. No on-screen text, no watermark. Keep the location, the dialogue, the actions, the wardrobe and the lighting identical to @Video1, with the same timing: the same words at the same moments and the same gestures. Change only the camera.
See what gets sent, under the prompt switch, shows every prompt before you generate. The optional Prompt switch adds your own notes to every shot, like the colour of a prop. We left it off.
Tip:Pay for angles, not cuts. Every angle you use renders once over the whole take, so two parts on the same angle cost the same as one. Four angles on a 15 second take is four renders of the take, however many cuts there are.
Generate
Pick the Model and the Quality. We used Seedance 2.5 at 720p, the default. The button then reads Generate 4 shots with the price beside it, and the line under it says what that covers: every shot, each long enough to cover your whole take, with the highlight edit free. Nothing is spent until you press it.
A render runs in whole seconds and never stops short of the take, so each angle of our 15 second take was a 16 second render. Once you press Generate you can close the page: the job finishes on the server and the same link shows it when you come back. Stop ends it early, and an angle that had not started yet is never charged.
Watch for this:If the model refuses your take. That angle stops and its credits come back. Footage of well known people and copyrighted material is refused, so use a take you shot or made yourself.
Your shots and the multicam edit
When the angles are in, the canvas shows Your shots: the original and every angle, each its own player with its name in the corner, its own download and Re-make at today's price. Play all in sync plays them together from the same moment. Download all shots gives you one file with the original and every angle, named by angle. Open in Studio puts every angle on its own track over the original sound, so you can cut your own version.
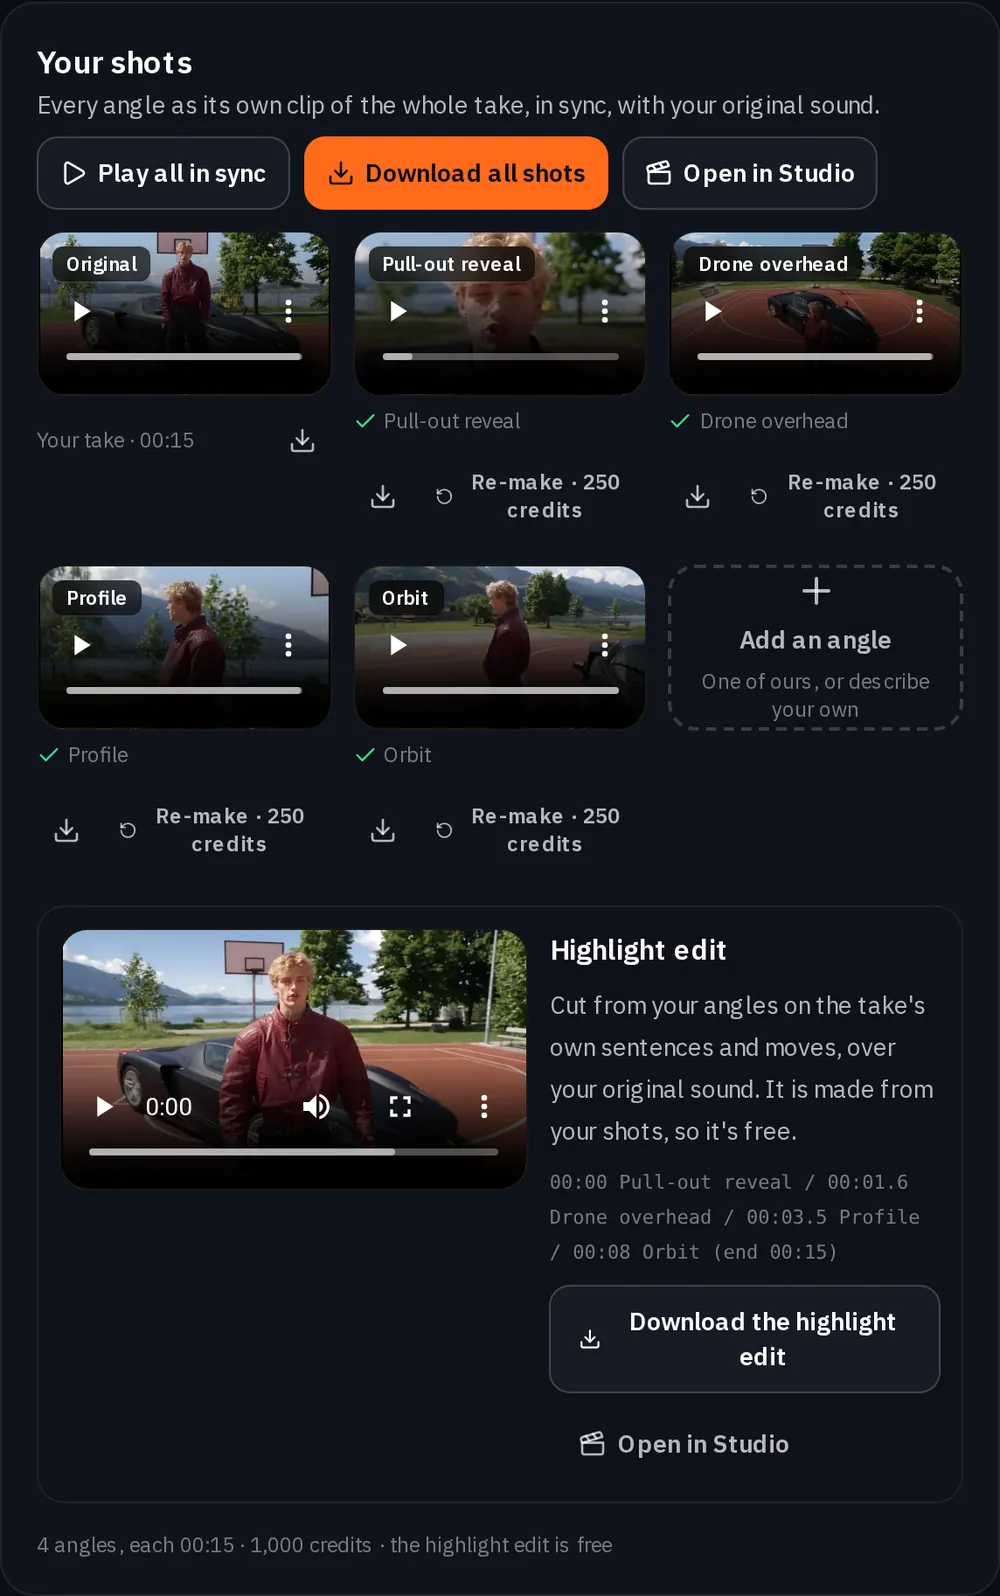
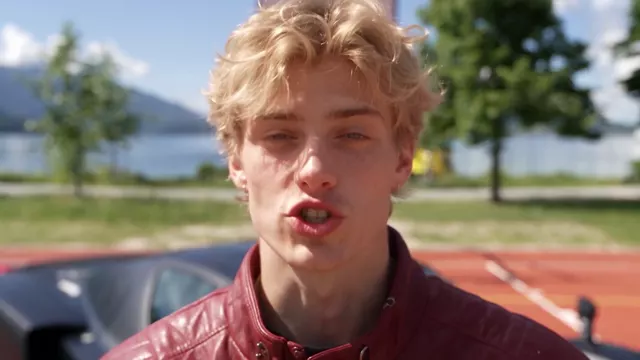
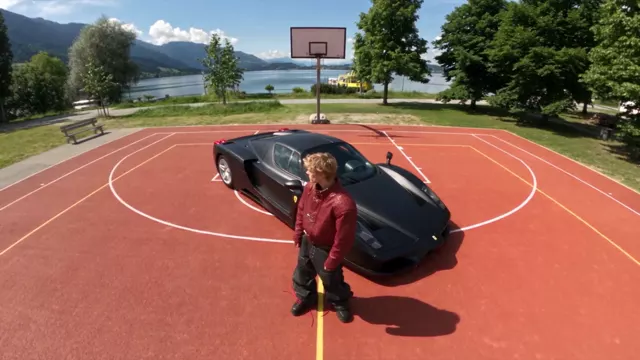
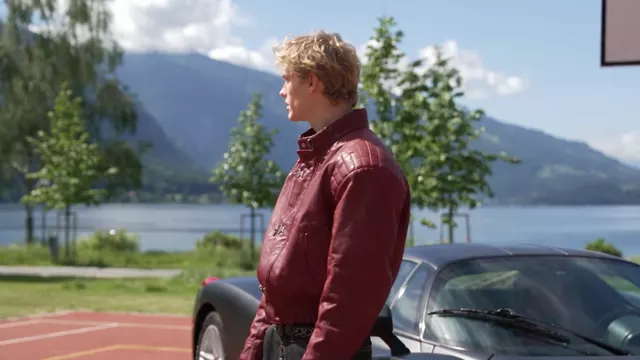
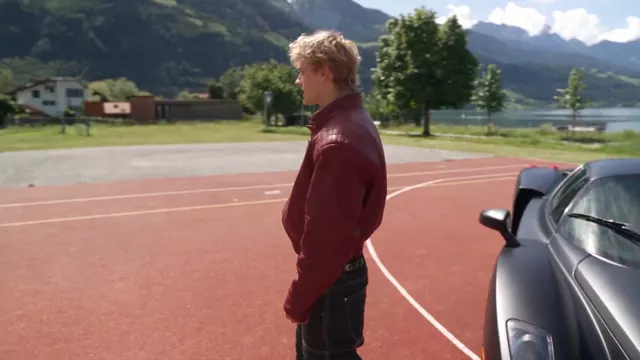
Each clip runs the full 15 seconds, in sync with the take. The clips on this page are shown without sound; every one carries the take's own. Below the shots is the Highlight edit: the angles cut together on your cut list, over your original sound, with its own download and Open in Studio. It is made from your shots, so it is free.
Your take
Highlight edit
Add an angle, the last tile in the grid, renders one more angle over the same take, with the price on its own Generate button. Rebuild the highlight edit then cuts it in for free and keeps the old version in your Library.
Every angle we made, and the ones that missed
The edit above came from the last of four finished Multicam runs on this take. The first three ran on a 10.6 second trim of it with three to five angles each; the last ran on the full 15 seconds, so the edit carries the whole line. Sixteen angles in all, each Seedance 2.5 at 720p, and each run made its own highlight edit. Multicam checks every render against the take, and none of the sixteen came back as a copy of the take's own framing.
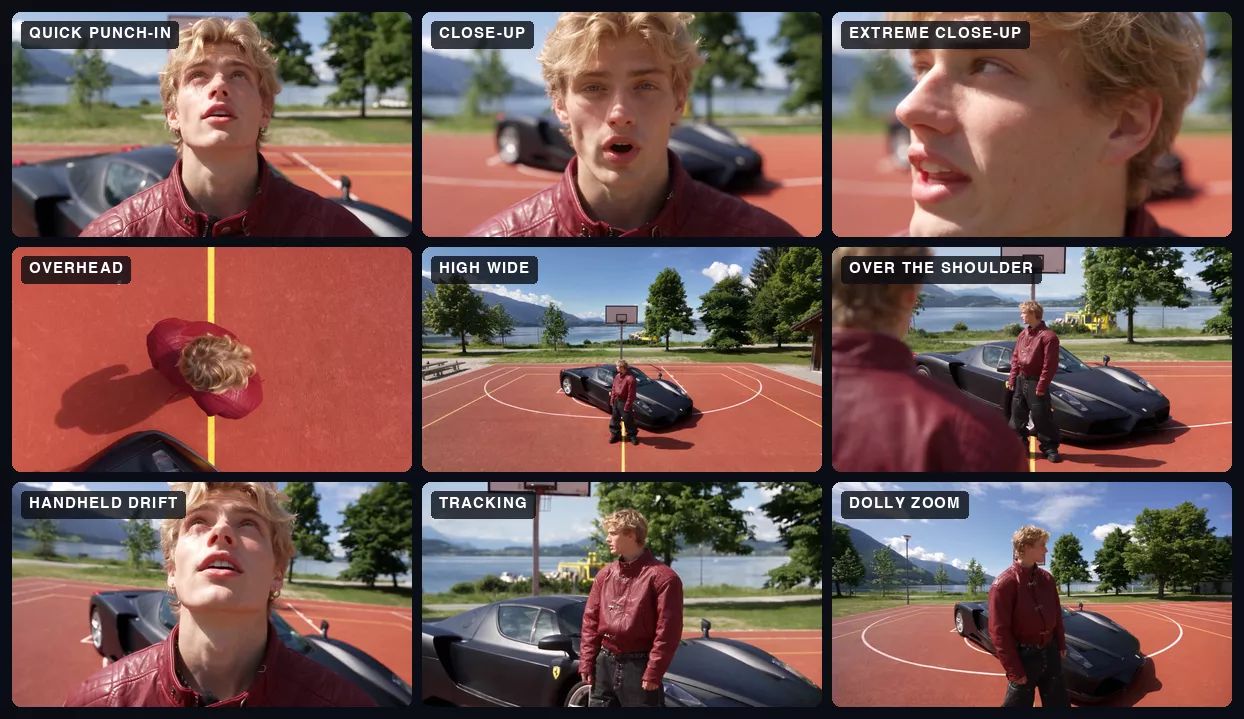
- Over the shoulder needs a second person. With only him in the take, the model put a copy of him in the foreground to look past. Keep it for a dialogue scene, where the Scene coverage pack pairs it with a close up of each person.
- Positions read at a glance. Overhead, High wide and Drone overhead put the camera where they say, straight down or high and far back.
- Close framings follow his turns. Close-up, Extreme close-up and Quick punch-in stay on his face as he looks up and away, which is where the head turns in the take pay off.
- Play a move before you cut it in. A move is harder to judge from one frame: our Dolly zoom kept him about the same size while the court and the trees behind him shifted. Re-make tries any angle again at the price on its button.
What it took
Multicam prices each angle by the length of the take at the quality you pick, and the exact price is on the Generate button before anything runs. The scan is free, reading the words costs a little, the highlight edit and every rebuild are free, and an angle the model refuses is refunded. This whole project was:
| What | What ran | How many |
|---|---|---|
| The character sheet | GPT Image 2.5 Sunburst, after one try on GPT Image 2.5 Flare | 2 images |
| The take | Seedance 2.5: 8 and 12 seconds at 4:3, then 12, 12 and 15 seconds at 1080p | 5 takes |
| The angles | Seedance 2.5 at 720p: twelve 11 second renders on the trim and four 16 second renders on the full take | 16 renders |
| The refused runs | Four runs on the 5.7 second trim, refused for its frame rate | Refunded |
| The highlight edits | One per finished run | 4, free |
Live rates for the models in this project. Every Multicam angle is a render with your take as its reference video, which Seedance 2.5 prices above a plain clip of the same length, so an angle costs more than the clip rate below; the Generate button has the exact price.
Seedance 2.5Pro and up
Per 5s clip
480p 26 credits · 720p 56 credits · 1080p 137 credits
1080p renders at 16:9 and 9:16
GPT Image 2.5 SunburstEvery plan
Per image
Native 8 credits · 2K 21 credits · 4K 58 credits
Read live from the catalog when this page loads. Every price is shown before you generate. See every rate.
Questions and answers
- How long can my take be?
- From 4 seconds to 2 minutes on Seedance 2.5. A take longer than one render is made in parts that join on a cut, so every angle still runs the full length of your take.
- Do the angles line up with my sound?
- Yes. Every clip carries your take's own sound and runs exactly as long as the take, so the clips line up in any editor. Open in Studio stacks them in sync for you.
- Can each sentence be its own shot?
- Yes. Cut on sentences too reads the words of the take first, at the price on its button, and the scan then cuts on new sentences as well as pauses and movement. You can still move, add or remove any cut.
- Do more cuts cost more?
- No. Each angle you use renders once over the whole take, so the price follows the number of angles and the length of the take. More cuts on the same angles cost nothing more, and the highlight edit is free.
- Can I describe my own angle?
- Yes. Use Your own angle and say where the camera is and where it looks, for example a camera inside the cup looking up.
- Will I get exactly the same result with your take?
- Not frame for frame. Every run is a new render, so two runs with the same take and settings come out different. If an angle is not right, press Re-make.
Get the coverage from one take.
Open MulticamRelated guides
Filmmaking
How to make realistic AI videos
The step-by-step workflow for realistic AI video: plan with the NOLGIA Agent, lock the characters and the place, write every shot beat by beat for Seedance 2.5, then score and cut.
· 20 min read
Video editing
Hands, faces and warping: the fixes that work
Six fixes for melting hands, drifting faces and objects that change shape mid-clip: the prompt, a reference image, the model, the length, the size and a restore pass. Each tested on one shot.
· 9 min read
Video editing
Restore soft, noisy or old footage
Restore Video re-renders a clip from your Library at up to 8K, cleaning noise, compression and softness. Pick the engine by what is wrong with the clip, and know what it cannot bring back.
· 6 min read